

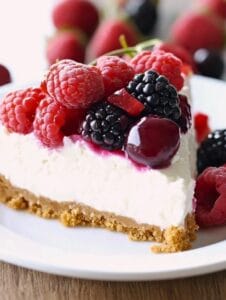
A dessert masterpiece that requires zero oven time, this Ultimate No-Bake Oreo Cheesecake is decadently rich, unbelievably creamy, and packed with the iconic cookies-and-cream flavor you love. It features a crunchy, buttery Oreo crust, a light and airy cheesecake filling studded with chunks of Oreo, and a beautiful whipped cream topping.
Save This Recipe! 💌
We'll email this post to you so you can cook it later!
Cuisine: American
Prep Time: 25 minutes
Chill Time: 4 hours
Total Time: 4 hours 25 minutes
Servings: 10 slices
Here’s a great video that shows the process of making simple oreo cheesecake.
Why You’ll Love Making It
- Absolutely No Baking Required: This is the perfect make-ahead dessert for any time of year, especially during warmer months. You can achieve a flawless, creamy cheesecake without ever turning on your oven, which means no worries about cracks or water baths.
- Packed with Oreo Flavor: This recipe uses Oreos in three ways: a crisp, buttery crust, generous chunks folded into the filling, and a decorative garnish on top. It’s a dream come true for any cookies-and-cream enthusiast.
- Perfectly Creamy & Light Texture: By whipping the heavy cream separately and gently folding it in, the filling becomes incredibly light, airy, and mousse-like, while still being rich and satisfying.
- Ideal for Beginners: The steps are straightforward and don’t require any complex techniques. It’s a foolproof way to impress guests with a stunning and delicious dessert.
- Make-Ahead Friendly: This cheesecake needs several hours to set, making it the perfect dessert to prepare a day in advance. This frees you up on the day of your event.

Ingredients
For the Oreo Crust:
- 24 Oreos: You’ll use the entire cookie, filling and all. The cream filling helps bind the crust together.
- 4 tablespoons (60g) Unsalted Butter, Melted: This binds the cookie crumbs to create a firm, sliceable base.
For the Cheesecake Filling:
- 16 ounces (2 blocks) Brick-Style Cream Cheese, Softened: It is crucial to use full-fat, block-style cream cheese for the best structure and flavor. Spreadable or low-fat versions will not set properly. Allow it to sit at room temperature for at least an hour for a lump-free filling.
- 1 cup (120g) Powdered Sugar: Also known as confectioners’ sugar, this dissolves easily, ensuring a smooth, grain-free texture.
- 1 teaspoon Vanilla Extract: Use pure vanilla extract for the best flavor, as its taste will shine in this no-bake recipe.
- 2 cups (480ml) Cold Heavy Whipping Cream: The fat content is essential for creating stable, stiff peaks that give the cheesecake its light yet firm structure. Make sure it’s very cold before you start whipping.
- 16 Oreos, Roughly Chopped: These are folded into the filling to provide a satisfying cookie crunch in every bite. Aim for bite-sized chunks rather than fine crumbs.
For Optional Garnish:
- Homemade Whipped Cream: For piping or spreading on top.
- 12-14 Mini Oreos or 6 Full-Size Oreos, Halved: For a professional-looking finish.
Instructions
Step 1: Make the Oreo Crust
Crush the Oreos: Place the 24 whole Oreos into a food processor and pulse until they become fine crumbs. Alternatively, put them in a large zip-top bag, seal it, and crush them with a rolling pin.
Combine with Butter: Transfer the fine crumbs to a medium bowl. Pour the melted butter over the crumbs and stir with a fork until the mixture is evenly moistened and resembles damp sand.
Press into Pan: Lightly grease a 9-inch springform pan and line the bottom with parchment paper for easy removal. Tip the crumb mixture into the pan and press it down firmly and evenly across the bottom using the flat bottom of a measuring cup or glass.
Chill the Crust: Place the pan in the refrigerator to chill and firm up for at least 30 minutes while you prepare the filling. This step is crucial for a sturdy base.
Step 2: Prepare the Cheesecake Filling
Beat the Cream Cheese: In a large mixing bowl, beat the softened cream cheese with a hand mixer or in a stand mixer on medium speed until it is completely smooth and free of lumps. Scrape down the sides of the bowl as needed.
Add Sugar and Vanilla: Add the powdered sugar and vanilla extract to the cream cheese. Mix on low speed at first, then increase to medium and beat until the mixture is smooth and well combined.
Whip the Heavy Cream: In a separate, chilled bowl, pour in the cold heavy whipping cream. Beat on low speed, gradually increasing to medium-high, until stiff peaks form. Stiff peaks mean that when you lift the beaters, the cream stands straight up without collapsing. Be careful not to over-whip, or it will turn grainy.
Combine and Fold: Using a spatula, gently fold the whipped cream into the cream cheese mixture in two or three additions. This folding technique keeps the filling light and airy. Once the whipped cream is incorporated, gently fold in the 16 chopped Oreos until they are evenly distributed.
Step 3: Assemble and Chill the Cheesecake
Decorate and Serve: Once fully set, run a thin knife around the edge of the cheesecake before releasing the springform pan’s side. If desired, decorate the top with piped whipped cream and additional Oreos.
Fill the Crust: Remove the chilled crust from the refrigerator. Spoon the cheesecake filling onto the crust and spread it into a smooth, even layer with an offset spatula or the back of a spoon.
Chill to Set: Cover the cheesecake tightly with plastic wrap or aluminum foil. Refrigerate for at least 4 hours, but for the best, firmest texture, let it chill overnight. Patience is key; rushing this step can result in a soft cheesecake.
Expert Tips for Success
- How to Get Clean Slices: For picture-perfect slices, use a long, sharp knife. Dip the knife in hot water and wipe it clean with a paper towel before each cut. This method prevents the cheesecake from sticking and ensures a clean edge every time.
- Room Temperature is Crucial: Your cream cheese must be at room temperature to achieve a silky-smooth, lump-free filling. Cold cream cheese will not blend properly.
- Don’t Deflate the Filling: The “folding” technique is important. Use a spatula to gently scrape along the bottom of the bowl and bring it up over the top, rotating the bowl as you go. This combines the mixtures without knocking out the air you incorporated into the whipped cream.
FAQs
Why is my no-bake cheesecake not firm?
This is a common issue and usually has one of two causes. First, the cheesecake may simply need more time to chill and set; overnight is always best. Second, the whipped cream might not have been beaten to stiff peaks, which is essential for providing structure.
Can I make this cheesecake ahead of time?
Absolutely! This cheesecake is best made a day in advance to allow it to set completely. It can be stored, covered, in the refrigerator for up to 4 days.
Can I freeze this Oreo cheesecake?
Yes, this cheesecake freezes beautifully. Wrap the whole cheesecake (or individual slices) tightly in plastic wrap and then a layer of aluminum foil. It can be frozen for up to 2 months. Thaw it in the refrigerator overnight before serving.

Simple Oreo Cheesecake
Ingredients
For the Oreo Crust
- 24 Oreos
- 4 tbsp Melted Unsalted Butter
For the Cheesecake Filling
- 16 oz Softened Brick-Style Cream Cheese
- 1 cup Powdered Sugar
- 1 tsp Vanilla Extract
- 2 cups Cold Heavy Whipping Cream
- 16 Roughly Chopped Oreos
For Optional Garnish
- Homemade Whipped Cream
- 12-14 Mini Oreos or 6 Full-Size Oreos, Halved
Instructions
- Crush the Oreos: Place the 24 whole Oreos into a food processor and pulse until they become fine crumbs. Alternatively, put them in a large zip-top bag, seal it, and crush them with a rolling pin.Combine with Butter: Transfer the fine crumbs to a medium bowl. Pour the melted butter over the crumbs and stir with a fork until the mixture is evenly moistened and resembles damp sand.Press into Pan: Lightly grease a 9-inch springform pan and line the bottom with parchment paper for easy removal. Tip the crumb mixture into the pan and press it down firmly and evenly across the bottom using the flat bottom of a measuring cup or glass.Chill the Crust: Place the pan in the refrigerator to chill and firm up for at least 30 minutes while you prepare the filling. This step is crucial for a sturdy base.
- Beat the Cream Cheese: In a large mixing bowl, beat the softened cream cheese with a hand mixer or in a stand mixer on medium speed until it is completely smooth and free of lumps. Scrape down the sides of the bowl as needed.Add Sugar and Vanilla: Add the powdered sugar and vanilla extract to the cream cheese. Mix on low speed at first, then increase to medium and beat until the mixture is smooth and well combined.Whip the Heavy Cream: In a separate, chilled bowl, pour in the cold heavy whipping cream. Beat on low speed, gradually increasing to medium-high, until stiff peaks form. Stiff peaks mean that when you lift the beaters, the cream stands straight up without collapsing. Be careful not to over-whip, or it will turn grainy.Combine and Fold: Using a spatula, gently fold the whipped cream into the cream cheese mixture in two or three additions. This folding technique keeps the filling light and airy. Once the whipped cream is incorporated, gently fold in the 16 chopped Oreos until they are evenly distributed.
- Decorate and Serve: Once fully set, run a thin knife around the edge of the cheesecake before releasing the springform pan's side. If desired, decorate the top with piped whipped cream and additional Oreos.Fill the Crust: Remove the chilled crust from the refrigerator. Spoon the cheesecake filling onto the crust and spread it into a smooth, even layer with an offset spatula or the back of a spoon.Chill to Set: Cover the cheesecake tightly with plastic wrap or aluminum foil. Refrigerate for at least 4 hours, but for the best, firmest texture, let it chill overnight. Patience is key; rushing this step can result in a soft cheesecake.
Notes
- How to Get Clean Slices: For picture-perfect slices, use a long, sharp knife. Dip the knife in hot water and wipe it clean with a paper towel before each cut. This method prevents the cheesecake from sticking and ensures a clean edge every time.
- Room Temperature is Crucial: Your cream cheese must be at room temperature to achieve a silky-smooth, lump-free filling. Cold cream cheese will not blend properly.
- Don’t Deflate the Filling: The “folding” technique is important. Use a spatula to gently scrape along the bottom of the bowl and bring it up over the top, rotating the bowl as you go. This combines the mixtures without knocking out the air you incorporated into the whipped cream.
Save This Recipe! 💌
We'll email this post to you so you can cook it later!


Hey, can I use margarine instead of butter for the crust? Not sure if it change the taste much.
I tried making this and it actually turned out pretty good even though I messed up the sugar part haha, wasnt that hard.
Isn’t it better to use a water bath for cheesecakes? Keeps it from cracking right?
Water bath is great for baked cheesecakes, but this recipe seems to be a no-bake version so it’s not needed.
omg made this for my family and they loved it!!!
Reading this article is like being in a Marvel movie – I got to the end and wanted a sequel. More cheesecake adventures, please!
Because we all have a food processor just lying around, don’t we?
Sandra Clare, this recipe is a gem! I’ve made it three times this month already. Thank you!
Actually, for those wondering, the first cheesecake was believed to be made in ancient Greece. Fun fact when you’re enjoying this modern version.
Great, another cheesecake recipe to make me feel guilty about my diet. Thanks a bunch.
Wouldn’t it be easier to just buy a cheesecake though? This seems like a lot of work for the same thing.
Has anyone tried adding fruit toppings? Wondering how that’d go.
I find the simplicity of this recipe quite fascinating. It’s accessible yet potentially elegant.
No way this tastes good without baking. Cheesecake needs heat to taste right.
Love this no-bake idea! Gonna try it this weekend.
The cheesecake tradition has evolved significantly over centuries. This recipe is a testament to how far culinary arts have come.
this looks super easy gonna make it for my girl she loves cheesecake
Could you use a blender instead of a food processor for the Oreos?
Made this and regretted it. Too good, ate it all in one day and now I gotta hit the gym twice as much.
Can I use less sugar in the filling? Trying to cut down on the sweet.
Reminds me of the cheesecake my wife used to make. Thank you for the nostalgia.
Looks too complicated. I’ll stick to store-bought.
Sweeeet! Can’t wait to drown in this cheesecake heaven!