
Save This Recipe! 💌
- Cuisine: Korean
- Prep Time: 10 minutes
- Cook Time: 15 minutes
- Total Time: 25 minutes
- Servings: 4
Why You’ll Love This Recipe
- 25 Minutes Start to Finish – Faster than delivery, better than takeout.
- One Pan – Just a skillet and a pot of rice, minimal cleanup.
- Sweet & Savory Flavor – Soy sauce, brown sugar, sesame oil, and garlic in every bite.
- Budget Friendly – Ground beef and pantry staples keep the cost low.
- Easily Customizable – Swap the protein, add veggies, or adjust the heat level.
Ingredients
- 1 pound lean ground beef (90% lean): Provides the protein base. Use turkey if you prefer a leaner option.
- 3 garlic cloves (minced): Adds robust, aromatic flavor.
- 1/4 cup packed brown sugar: Balances the savory elements with sweetness.
- 1/4 cup reduced-sodium soy sauce: Adds umami depth without overwhelming saltiness. Regular soy sauce can be used sparingly as a substitute.
- 2 teaspoons sesame oil: Adds rich, nutty flavor. Olive oil can stand in if needed but will alter the taste slightly.
- 1/4 teaspoon ground ginger: Provides warm, zesty undertones. Use fresh ginger if available for more intensity.
- 1/4 teaspoon crushed red pepper flakes: Offers a subtle heat. Adjust to taste or omit if your household prefers mild flavors.
- 1/4 teaspoon pepper: Enhances the overall seasoning.
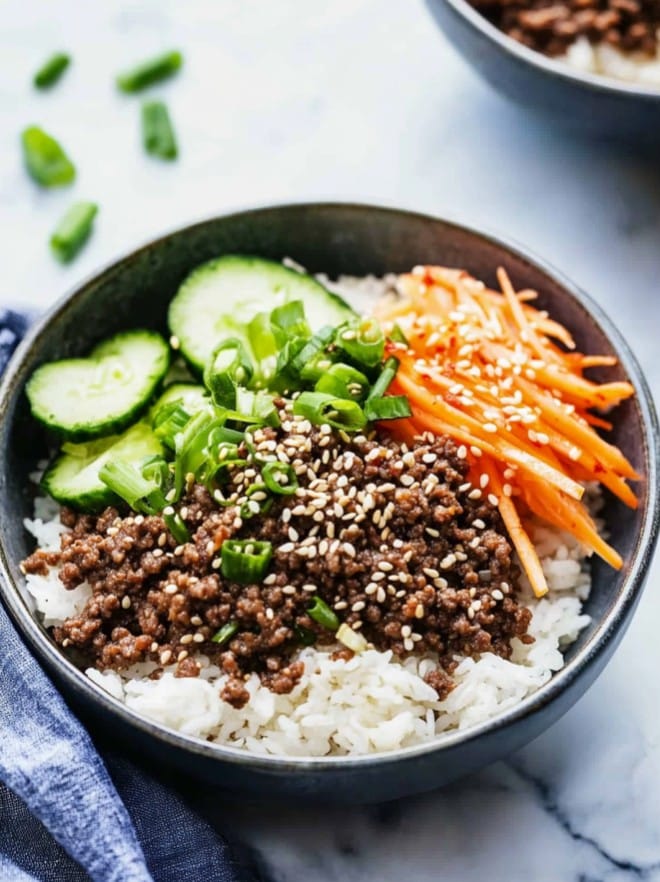
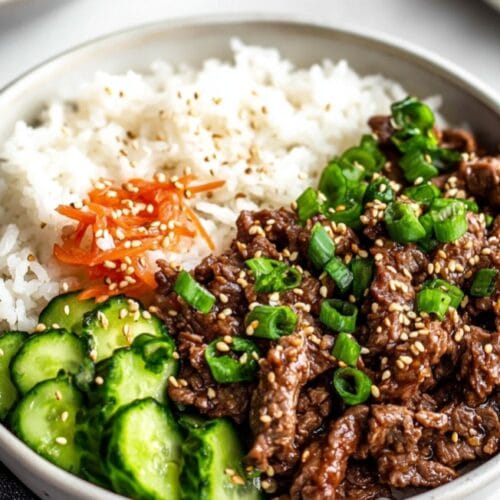
- 2 cups hot cooked white or brown rice: Serves as a hearty base. Brown rice adds more fiber if desired.
- Sliced green onions and sesame seeds for garnish: Adds brightness and texture.
How to Make It
Step 1: Cook the Beef and Garlic
In a large skillet, heat the ground beef and minced garlic over medium heat. Break the meat into crumbles using a wooden spoon, cooking until it’s no longer pink. This ensures even cooking and allows the garlic to infuse the beef with its rich aroma. Drain any excess grease to keep the dish from becoming too oily.
Step 2: Prepare the Sauce
In a small bowl, whisk together the brown sugar, soy sauce, sesame oil, ground ginger, red pepper flakes, and pepper. This mixture creates a balanced, savory-sweet sauce that will coat the beef. Whisk thoroughly to dissolve the sugar completely.
Step 3: Combine and Simmer
Pour the sauce over the cooked beef in the skillet, stirring to coat all the pieces evenly. Simmer for one to two minutes to let the flavors meld. The beef should glisten with the sauce, indicating that it has absorbed the flavors.
Step 4: Serve and Garnish
Serve the beef mixture over hot cooked rice. Top with sliced green onions and sesame seeds for garnish. These add color and a fresh, crunchy contrast to the savory beef.
Recipe FAQs
Can I meal prep Korean ground beef rice bowls?
Yes — this is one of the best meal prep recipes around. Cook a double batch of the beef and store it separately from the rice in airtight containers in the fridge for up to 4 days. Reheat the beef in a skillet with a tiny splash of soy sauce to freshen it up, then serve over freshly cooked or microwaved rice.
What vegetables can I add to Korean beef rice bowls?
This dish is great with added veggies. Stir in shredded carrots, baby spinach, edamame, or sliced bell peppers right after draining the beef and before adding the sauce. They’ll soften just enough in the 1-2 minute simmer without getting mushy. A fried egg on top is also a delicious addition.
Easy Korean Ground Beef Rice Bowls (Ready in 25 Minutes!)
Ingredients
- 1 pound lean ground beef 90% lean: Provides the protein base. Use turkey if you prefer a leaner option.
- 3 garlic cloves minced: Adds robust, aromatic flavor.
- 1/4 cup packed brown sugar: Balances the savory elements with sweetness.
- 1/4 cup reduced-sodium soy sauce: Adds umami depth without overwhelming saltiness. Regular soy sauce can be used sparingly as a substitute.
- 2 teaspoons sesame oil: Adds rich nutty flavor. Olive oil can stand in if needed but will alter the taste slightly.
- 1/4 teaspoon ground ginger: Provides warm zesty undertones. Use fresh ginger if available for more intensity.
- 1/4 teaspoon crushed red pepper flakes: Offers a subtle heat. Adjust to taste or omit if your household prefers mild flavors.
- 1/4 teaspoon pepper: Enhances the overall seasoning.
- 2 cups hot cooked white or brown rice: Serves as a hearty base. Brown rice adds more fiber if desired.
- Sliced green onions and sesame seeds for garnish: Adds brightness and texture.
Instructions
- Step 1: Cook the Beef and Garlic
- In a large skillet, heat the ground beef and minced garlic over medium heat. Break the meat into crumbles using a wooden spoon, cooking until it’s no longer pink. This ensures even cooking and allows the garlic to infuse the beef with its rich aroma. Drain any excess grease to keep the dish from becoming too oily.
- Step 2: Prepare the Sauce
- In a small bowl, whisk together the brown sugar, soy sauce, sesame oil, ground ginger, red pepper flakes, and pepper. This mixture creates a balanced, savory-sweet sauce that will coat the beef. Whisk thoroughly to dissolve the sugar completely.
- Step 3: Combine and Simmer
- Pour the sauce over the cooked beef in the skillet, stirring to coat all the pieces evenly. Simmer for one to two minutes to let the flavors meld. The beef should glisten with the sauce, indicating that it has absorbed the flavors.
- Step 4: Serve and Garnish
- Serve the beef mixture over hot cooked rice. Top with sliced green onions and sesame seeds for garnish. These add color and a fresh, crunchy contrast to the savory beef.
Notes
- Drain the grease: After browning the beef, drain excess fat before adding the sauce — otherwise the dish can get greasy and the sauce won’t cling properly.
- Brown sugar: Don’t skip this — it’s what gives the beef its signature sweet-savory Korean-inspired glaze. Honey works as a 1:1 swap.
- Sesame oil: Add it to the sauce, not the pan. It’s a finishing flavor and burns easily at high heat.
- Rice: Day-old rice works great here — it’s drier and absorbs the sauce beautifully. Freshly cooked rice is fine too.
- Heat level: The recipe as written is mild. Add more red pepper flakes or a drizzle of sriracha for more heat.
- Storage: Beef keeps in the fridge for up to 4 days or freeze for up to 3 months.