
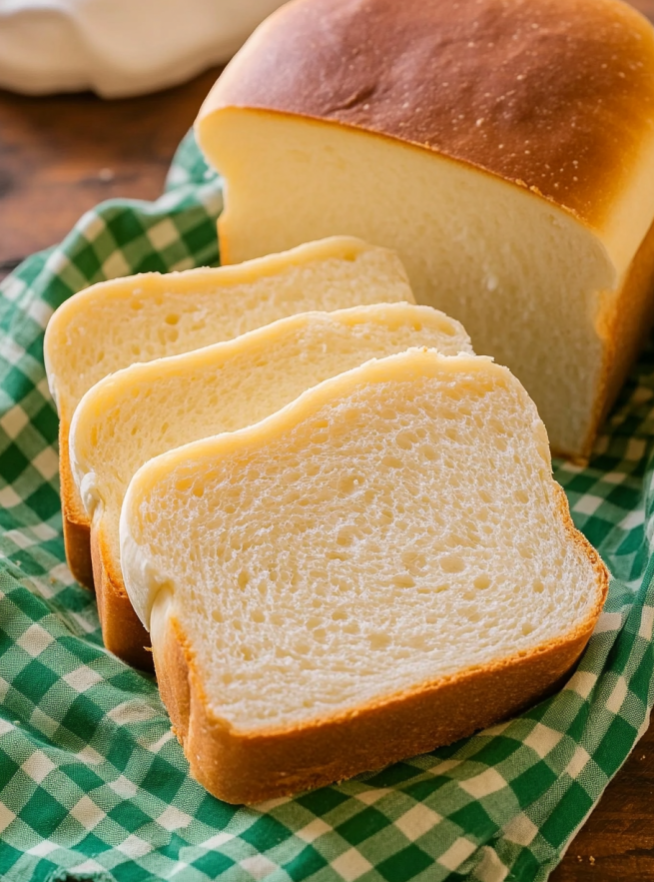
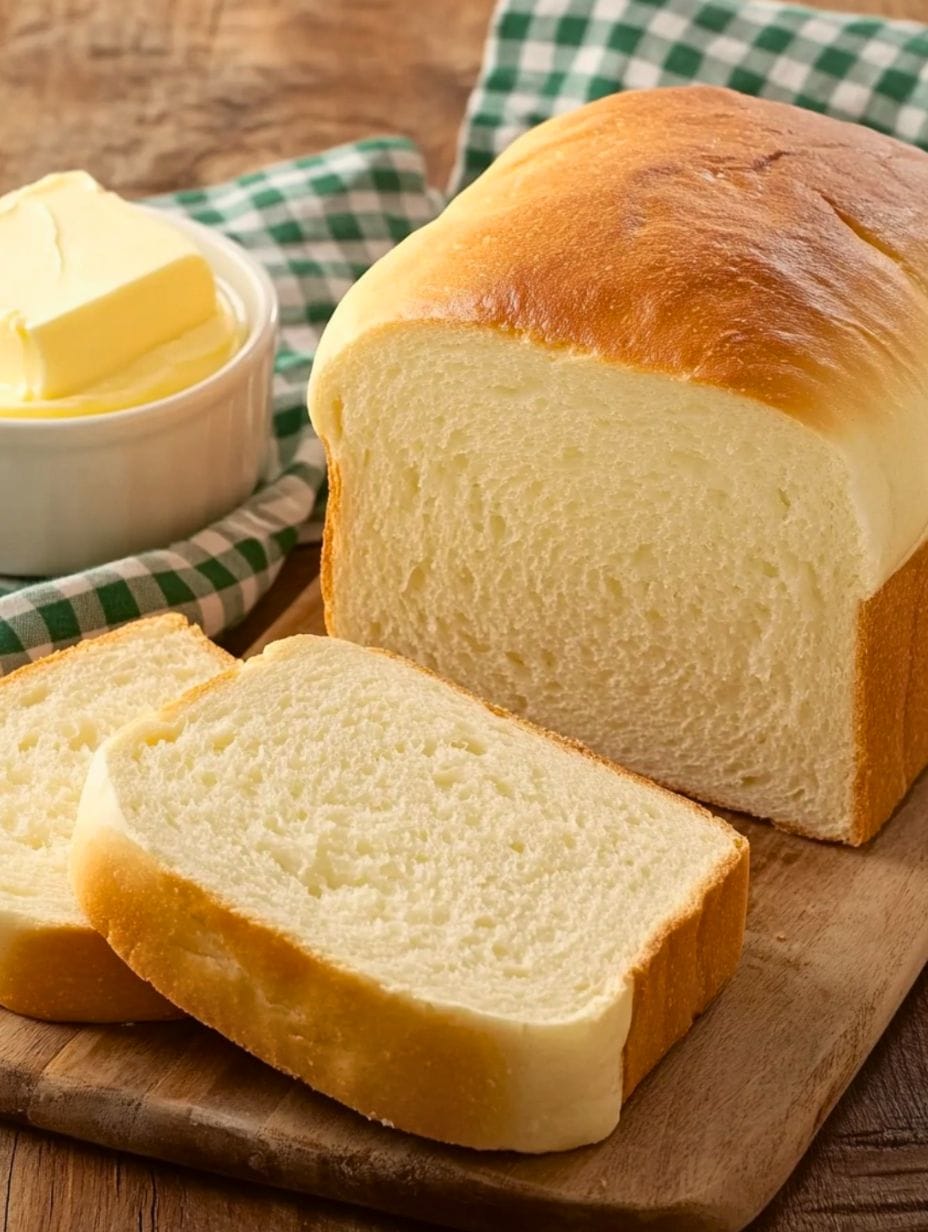
There’s nothing more comforting than the aroma of freshly baked bread wafting through your home. This foolproof recipe for traditional white bread is designed for bakers of all levels, especially beginners. It will guide you through each step to create two beautiful loaves with a golden-brown crust and a wonderfully soft, pillowy interior.
Save This Recipe! 💌
Cuisine: American
Prep Time: 20 mins
Cook Time: 30 mins
Additional Time: 1 hr 40 mins
Total Time: 2 hrs 30 mins
Servings: 20
Here’s a great video that shows the process of making easy white bread.
Why You’ll Love Making It
- Simple & Beginner-Friendly: This recipe breaks down the bread-making process into easy, manageable steps, making it a perfect introduction for anyone new to baking with yeast.
- Deliciously Soft & Fluffy: The use of bread flour and a tenderizing fat like lard or butter results in a classic soft texture that’s ideal for sandwiches, toast, or enjoying on its own.
- No Special Equipment Needed: While a stand mixer can help, this recipe is designed to be made by hand with just a bowl and a spoon. You’ll learn the rewarding and tangible skill of kneading dough.
- Fresher and Tastier Than Store-Bought: You control the ingredients, which means no unnecessary additives or preservatives—just pure, delicious, homemade goodness.
- Cost-Effective: Baking your own bread is incredibly economical. This recipe yields two full loaves for a fraction of what you would pay for artisan bread at a store.
Ingredients
- 2 (.25 ounce) packages active dry yeast (This is equivalent to 4 ½ teaspoons)
- 3 tablespoons white sugar (Feeds the yeast and adds a hint of sweetness)
- 2 ½ cups warm water (Crucial for activating yeast; aim for 110°F/45°C. It should feel like a warm bath, not hot)
- 6 ½ cups bread flour (Higher in protein for a chewier, more structured loaf. All-purpose flour can be substituted, but the texture will be slightly softer)
- 3 tablespoons lard, softened (Adds incredible tenderness. Softened butter or vegetable shortening are excellent substitutes)
- 1 tablespoon salt (Essential for flavor and for controlling the yeast’s activity for an even rise)
Instructions
Step 1: Activate the Yeast (Proofing)
In a large mixing bowl, dissolve the sugar in the warm water. Sprinkle the yeast over the top. Let it stand for 5-10 minutes until the mixture becomes foamy and frothy on top. This “proofs” the yeast, ensuring it’s alive and active. If it doesn’t foam, your yeast may be expired, and you’ll need to start over with fresh yeast.
Step 2: Mix the Dough
Once the yeast is bubbly, add the softened lard, salt, and about 2 cups of the bread flour to the bowl. Stir with a wooden spoon until everything is well combined. Continue adding the flour, about ½ cup at a time, until a soft, slightly sticky dough forms and begins to pull away from the sides of the bowl.
Step 3: Knead the Dough
Turn the dough out onto a lightly floured surface. Knead for 8-10 minutes. Use a push-fold-turn motion: push the dough away with the heel of your hand, fold it over on itself, and give it a quarter turn. Continue this rhythm until the dough becomes smooth and elastic. If it’s too sticky, add a tablespoon of flour at a time, but avoid adding too much, as this can create a dense loaf.
Pro-Tip: To check if it’s kneaded enough, perform the “windowpane test.” Pinch off a small piece of dough and gently stretch it between your fingers. If you can stretch it thin enough to see light through it without it tearing, the gluten is well-developed, and it’s ready.
Step 4: First Rise (Bulk Fermentation)
Lightly grease a clean, large bowl with oil or cooking spray. Place the dough in the bowl, turning it over once to coat the top with oil. Cover the bowl with a damp cloth or plastic wrap. Let it rise in a warm, draft-free spot for about 1 hour, or until it has doubled in size.
Step 5: Shape the Loaves
Gently punch down the risen dough to release the air. Transfer it to a lightly floured surface and divide it into two equal pieces. To shape each loaf, gently flatten one piece of dough into a rectangle. Starting from a short end, roll the dough up tightly into a log, pinching the seam closed with each roll to prevent large air pockets. Once rolled, pinch the final seam and the ends of the loaf to seal them, and tuck the ends slightly under. Place each loaf, seam-side down, into a greased 9×5-inch loaf pan.
Step 6: Second Rise
Cover the loaf pans with a damp cloth and let them rise in a warm place for another 40 minutes, or until the dough has risen about 1 inch above the rim of the pans.
Step 7: Bake the Bread
Preheat your oven to 425°F (220°C). Place the loaves on the center rack and immediately reduce the oven temperature to 375°F (190°C). This initial high heat helps the bread rise rapidly (known as “oven spring”). Bake for about 30 minutes, or until the crust is a deep golden brown and the loaves sound hollow when tapped on the bottom. For a guaranteed perfect bake, the internal temperature should read 190-195°F (88-90°C) on an instant-read thermometer.
Step 8: Cool & Serve
Remove the loaves from the oven and let them cool in the pans for about 10 minutes before carefully turning them out onto a wire rack. It’s crucial to let the bread cool completely before slicing. Slicing warm bread can cause the soft interior to tear and have a gummy texture.
FAQs
Can I use all-purpose flour instead of bread flour?
Yes, you can. All-purpose flour will result in a slightly softer, less chewy bread because it has a lower protein content. The bread will still be delicious.
Why didn’t my bread rise?
There are a few common reasons: the yeast was expired or killed by water that was too hot (over 120°F/49°C), or the room was too cold, which slows down the rising process. Always check your yeast’s expiration date and use lukewarm water.
Can I use a stand mixer?
Absolutely! Use the dough hook attachment. After combining the ingredients, knead on low speed for 8-10 minutes, or until the dough is smooth, elastic, and clears the sides of the bowl.
My bread is too dense. What went wrong?
Dense bread is often caused by using too much flour, not kneading the dough long enough to develop the gluten, or not letting it rise for the full time. Be careful to add flour gradually during kneading and allow the dough to fully double in size during the rises.
How should I store homemade bread?
Store the completely cooled bread in a plastic bag or bread box at room temperature for up to 3-4 days. For longer storage, slice the loaf and freeze it in a freezer-safe bag for up to 3 months.
Easy White Bread
Ingredients
- 2 Packages Active Dry Yeast
- 3 tbsp White Sugar
- 2 ½ cup Warm Water
- 6 ½ cup Bread Flour
- 3 tbsp Lard Softened
- 1 tbsp Salt
Instructions
- In a large mixing bowl, dissolve the sugar in the warm water. Sprinkle the yeast over the top. Let it stand for 5-10 minutes until the mixture becomes foamy and frothy on top. This "proofs" the yeast, ensuring it's alive and active. If it doesn't foam, your yeast may be expired, and you'll need to start over with fresh yeast.
- Once the yeast is bubbly, add the softened lard, salt, and about 2 cups of the bread flour to the bowl. Stir with a wooden spoon until everything is well combined. Continue adding the flour, about ½ cup at a time, until a soft, slightly sticky dough forms and begins to pull away from the sides of the bowl.
- Turn the dough out onto a lightly floured surface. Knead for 8-10 minutes. Use a push-fold-turn motion: push the dough away with the heel of your hand, fold it over on itself, and give it a quarter turn. Continue this rhythm until the dough becomes smooth and elastic. If it's too sticky, add a tablespoon of flour at a time, but avoid adding too much, as this can create a dense loaf.Pro-Tip: To check if it's kneaded enough, perform the "windowpane test." Pinch off a small piece of dough and gently stretch it between your fingers. If you can stretch it thin enough to see light through it without it tearing, the gluten is well-developed, and it's ready.
- Lightly grease a clean, large bowl with oil or cooking spray. Place the dough in the bowl, turning it over once to coat the top with oil. Cover the bowl with a damp cloth or plastic wrap. Let it rise in a warm, draft-free spot for about 1 hour, or until it has doubled in size.
- Gently punch down the risen dough to release the air. Transfer it to a lightly floured surface and divide it into two equal pieces. To shape each loaf, gently flatten one piece of dough into a rectangle. Starting from a short end, roll the dough up tightly into a log, pinching the seam closed with each roll to prevent large air pockets. Once rolled, pinch the final seam and the ends of the loaf to seal them, and tuck the ends slightly under. Place each loaf, seam-side down, into a greased 9×5-inch loaf pan.
- Cover the loaf pans with a damp cloth and let them rise in a warm place for another 40 minutes, or until the dough has risen about 1 inch above the rim of the pans.
- Preheat your oven to 425°F (220°C). Place the loaves on the center rack and immediately reduce the oven temperature to 375°F (190°C). This initial high heat helps the bread rise rapidly (known as "oven spring"). Bake for about 30 minutes, or until the crust is a deep golden brown and the loaves sound hollow when tapped on the bottom. For a guaranteed perfect bake, the internal temperature should read 190-195°F (88-90°C) on an instant-read thermometer.
- Remove the loaves from the oven and let them cool in the pans for about 10 minutes before carefully turning them out onto a wire rack. It's crucial to let the bread cool completely before slicing. Slicing warm bread can cause the soft interior to tear and have a gummy texture.