

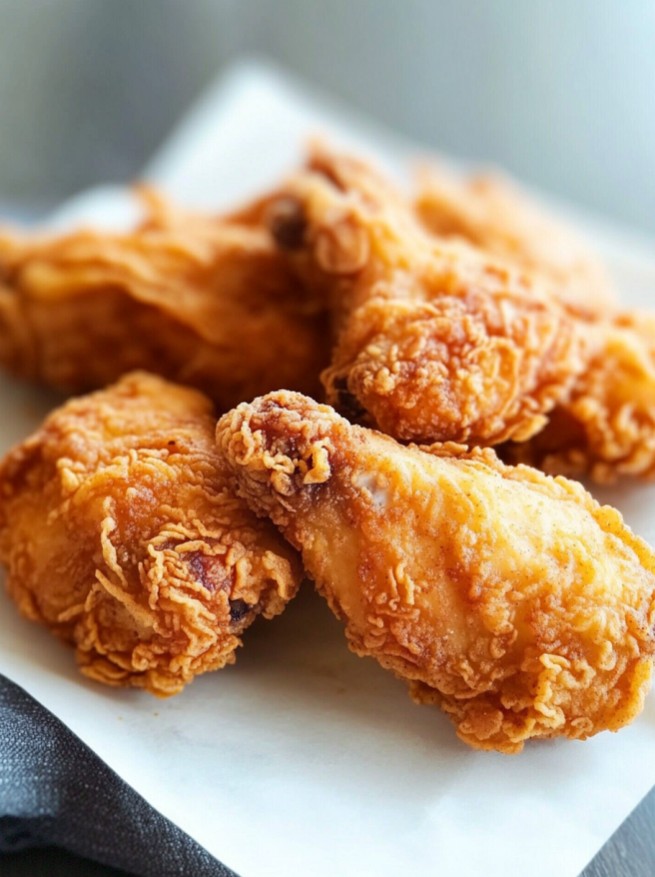
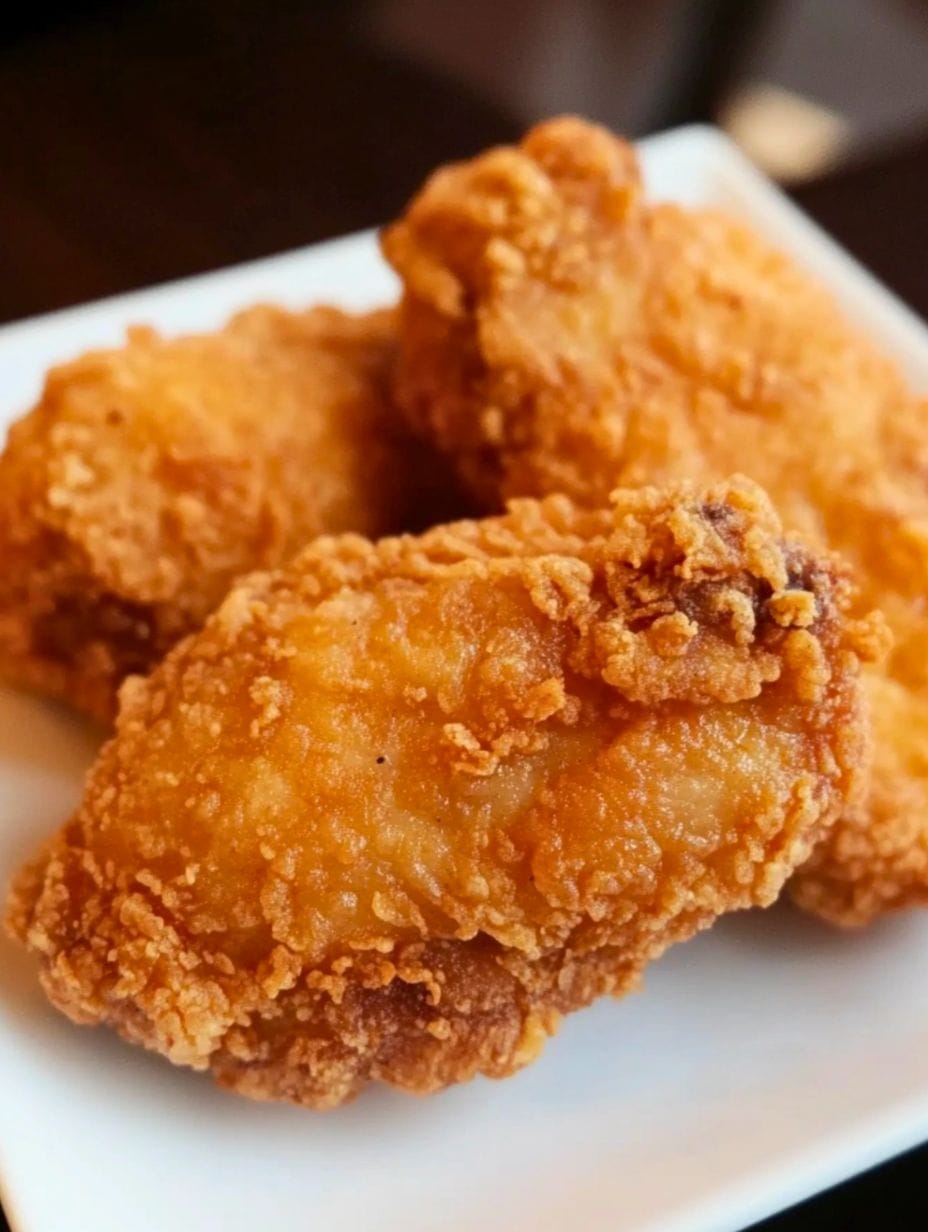
There are few culinary delights as universally loved as a perfectly cooked piece of fried chicken. By using a simple but effective brine and a two-step dredging method, you’ll achieve restaurant-quality results in your own kitchen.
Cuisine: American
Prep Time: 3 hours
Cooking Time: 15 minutes
Total Time: 3 hours 15 minutes
Servings: 6
Here’s a great video that shows the process of making easy fried chicken.
Why You’ll Love Making It
- Unbeatable Texture: The combination of a wet batter and a seasoned dry dredge creates a crunchy, craggy crust that remains crisp long after frying.
- Insanely Juicy Meat: Brining the chicken is the essential first step that ensures the meat is tender, moist, and seasoned from the inside out.[1]
- Simple, Accessible Ingredients: This recipe relies on common pantry staples, so you won’t need to hunt for specialty items.
- Perfect for Beginners: The detailed, step-by-step instructions break down the process, making it easy for anyone to master the art of frying chicken.
- Customizable Spice: Easily adjust the amount of cayenne pepper to make it as mild or as spicy as you like.
Ingredients
- 3 lbs bone-in, skin-on chicken pieces (drumsticks, thighs, or a mix)
- 4 cups whole milk (or buttermilk for extra tang)
- 1/4 cup kosher salt
- 8 cloves garlic, smashed
- 2 tbsp black peppercorns
- 3 bay leaves
- 2 cups all-purpose flour
- 2 cups cornstarch (The secret to an extra crispy crust)
- 1 tbsp kosher salt
- 1/2 tbsp white pepper
- 1 tbsp black pepper
- 1 tbsp garlic powder
- 1 tbsp onion powder
- 1/2 tbsp cayenne pepper (or more, to taste)
- 1 tbsp baking powder (Helps create a light, airy crust)
- Neutral oil for frying (such as vegetable, canola, or peanut oil)
Instructions
Step 1: Brine the Chicken for Maximum Juiciness
The first and most crucial step for moist, flavorful chicken is the brine. In a large bowl, whisk together the milk, salt, smashed garlic, black peppercorns, and bay leaves until the salt is mostly dissolved. Using the tip of a sharp knife, carefully pierce each piece of chicken a few times to allow the brine to penetrate deeply. Submerge the chicken pieces in the brine, ensuring they are fully covered. Cover the bowl and refrigerate for at least 3 hours, or preferably overnight for the best results.
Step 2: Prepare the Seasoning Mix
In a large, shallow dish or mixing bowl, whisk together the all-purpose flour, cornstarch, kosher salt, white pepper, black pepper, garlic powder, onion powder, cayenne pepper, and baking powder. Mix until thoroughly combined. This seasoned flour will be used for both the wet batter and the final dry dredge.
Step 3: Create the Wet Batter
Scoop out 1 cup of the seasoned flour mixture and place it in a separate medium-sized bowl. Slowly whisk in 1 cup of cold water until the batter is smooth and has the consistency of thin pancake batter. This wet batter is key to helping the final crust adhere and become extra crispy.
Step 4: Prepare the Chicken and Dry Dredge for Frying
Remove the chicken from the brine, allowing any excess liquid to drip off. For an extra-textured crust, spoon a few tablespoons of the brine into the remaining dry seasoning mix and rub it in with your fingertips. This creates small, flaky clumps that will stick to the chicken and become super crunchy when fried.
Step 5: The Two-Step Dredge
Working with one piece of chicken at a time, follow this sequence for a perfect coating: Dip the chicken into the wet batter, turning to coat it completely. Lift it out, letting any excess batter drip back into the bowl. Immediately transfer the chicken to the dry seasoning mix. Press the flour firmly onto all sides of the chicken to ensure a thick, even crust. Place the coated chicken on a wire rack and repeat with the remaining pieces. Let the chicken rest on the rack for a few minutes while the oil heats up; this helps the coating set.
Step 6: Fry to Golden Perfection
In a large Dutch oven, cast-iron skillet, or other heavy-bottomed pan, pour in about 2 inches of neutral oil. Heat the oil over medium-high heat until it reaches 350°F (175°C). A thermometer is highly recommended for accuracy.
Carefully place the chicken pieces into the hot oil, ensuring not to overcrowd the pan—fry in batches if necessary. Overcrowding can cause the oil temperature to drop, resulting in greasy chicken. Fry for 8-12 minutes, flipping the chicken halfway through, until the exterior is deep golden brown and crispy. The internal temperature should register 165°F (75°C) on a meat thermometer.
Step 7: Rest and Serve
Once cooked, transfer the fried chicken to a clean wire rack to allow excess oil to drain away. Letting it rest for at least 5-10 minutes is crucial; this allows the juices to redistribute throughout the meat, ensuring a perfect bite. Serve hot.
Pro-Tips for Beginners
- Best Oil for Frying: Use a neutral oil with a high smoke point, such as canola, vegetable, or peanut oil.
- Temperature is Key: Maintaining an oil temperature between 325°F and 350°F is critical. If the oil is too hot, the crust will burn before the inside is cooked. If it’s too cool, the chicken will absorb too much oil and become greasy.
- Safety First: When adding chicken to the skillet, lay it in the oil away from you to prevent hot oil from splashing. Never leave hot oil unattended.
FAQs
Can I bake this chicken instead of frying it?
While frying provides the crispiest result, you can bake it for a healthier alternative. Preheat your oven to 425°F (220°C). Place the coated chicken on a wire rack set over a baking sheet, spray generously with cooking oil, and bake for 35-45 minutes, flipping halfway through, until golden and cooked through.
Can I make this recipe with boneless chicken?
Yes, you can use boneless, skinless chicken breasts or thighs. They will cook much faster, typically in 6-10 minutes, so be sure to check the internal temperature to avoid overcooking.
How do I store and reheat leftovers?
Store leftover chicken in an airtight container in the refrigerator for up to 3 days. To reheat and restore crispiness, place the chicken on a wire rack on a baking sheet and bake in a 400°F (200°C) oven for 10-15 minutes until hot and crispy again.
What should I serve with fried chicken?
Fried chicken pairs wonderfully with a variety of classic sides. Some great options include creamy mashed potatoes, tangy coleslaw, buttermilk biscuits, cornbread, and corn on the cob.
Easy Fried Chicken
Ingredients
- 3 lbs Bone-in Skin-on Chicken Pieces Drumsticks, thighs, or a mix.
- 4 cup Whole Milk
- ¼ cup Kosher Salt
- 8 Cloves of Garlic Smashed.
- 2 tbsp Black Peppercorn
- 3 Bay Leaves
- 2 cup All-purpose Flour
- 2 cup Cornstarch
- 1 tbsp Kosher Salt
- ½ tbsp White Pepper
- 1 tbsp Black Pepper
- 1 tbsp Garlic Powder
- 1 tbsp Onion Powder
- ½ tbsp Cayenne Pepper
- 1 tbsp Baking Powder
- Neutral Oil For frying (such as vegetable, canola, or peanut oil).
Instructions
- The first and most crucial step for moist, flavorful chicken is the brine. In a large bowl, whisk together the milk, salt, smashed garlic, black peppercorns, and bay leaves until the salt is mostly dissolved. Using the tip of a sharp knife, carefully pierce each piece of chicken a few times to allow the brine to penetrate deeply. Submerge the chicken pieces in the brine, ensuring they are fully covered. Cover the bowl and refrigerate for at least 3 hours, or preferably overnight for the best results.
- In a large, shallow dish or mixing bowl, whisk together the all-purpose flour, cornstarch, kosher salt, white pepper, black pepper, garlic powder, onion powder, cayenne pepper, and baking powder. Mix until thoroughly combined. This seasoned flour will be used for both the wet batter and the final dry dredge.
- Scoop out 1 cup of the seasoned flour mixture and place it in a separate medium-sized bowl. Slowly whisk in 1 cup of cold water until the batter is smooth and has the consistency of thin pancake batter. This wet batter is key to helping the final crust adhere and become extra crispy.
- Remove the chicken from the brine, allowing any excess liquid to drip off. For an extra-textured crust, spoon a few tablespoons of the brine into the remaining dry seasoning mix and rub it in with your fingertips. This creates small, flaky clumps that will stick to the chicken and become super crunchy when fried.
- Working with one piece of chicken at a time, follow this sequence for a perfect coating: Dip the chicken into the wet batter, turning to coat it completely. Lift it out, letting any excess batter drip back into the bowl. Immediately transfer the chicken to the dry seasoning mix. Press the flour firmly onto all sides of the chicken to ensure a thick, even crust. Place the coated chicken on a wire rack and repeat with the remaining pieces. Let the chicken rest on the rack for a few minutes while the oil heats up; this helps the coating set.
- In a large Dutch oven, cast-iron skillet, or other heavy-bottomed pan, pour in about 2 inches of neutral oil. Heat the oil over medium-high heat until it reaches 350°F (175°C). A thermometer is highly recommended for accuracy.Carefully place the chicken pieces into the hot oil, ensuring not to overcrowd the pan—fry in batches if necessary. Overcrowding can cause the oil temperature to drop, resulting in greasy chicken. Fry for 8-12 minutes, flipping the chicken halfway through, until the exterior is deep golden brown and crispy. The internal temperature should register 165°F (75°C) on a meat thermometer.
- Once cooked, transfer the fried chicken to a clean wire rack to allow excess oil to drain away. Letting it rest for at least 5-10 minutes is crucial; this allows the juices to redistribute throughout the meat, ensuring a perfect bite. Serve hot.
Notes
- Best Oil for Frying: Use a neutral oil with a high smoke point, such as canola, vegetable, or peanut oil.
- Temperature is Key: Maintaining an oil temperature between 325°F and 350°F is critical. If the oil is too hot, the crust will burn before the inside is cooked. If it’s too cool, the chicken will absorb too much oil and become greasy.
- Safety First: When adding chicken to the skillet, lay it in the oil away from you to prevent hot oil from splashing. Never leave hot oil unattended.

just tried the chicken brine step, turned out super juicy. never thought brining made such a difference. thanks, Sandra Clare!
can i skip the brine part or is it like super important for taste??
I added extra cayenne pepper to the seasoning mix and it turned out amazing! Love a good kick.
if this chicken was a wizard, it’d be in hufflepuff cuz its just that good and friendly like.
Everyone’s a chef now, huh? Let’s see if this ‘simple’ recipe actually works.
Made this for my kids and they loved it, which says a lot because they’re picky eaters. Great recipe, Sandra!
anyone knows if i can use this batter for other stuff too?
yeah dude, works great for onion rings and mushrooms too!
Fried it exactly as instructed but didn’t get that crunch. Maybe it’s just me but was expecting more.
Absolutely loved brining the chicken as suggested, made a world of difference. Will feature this on my blog!
Isn’t frying just bad for you? Why not bake the chicken instead?
imagine frying this in a cauldron, would add an extra layer of mystery.
Can I substitute the frying oil with something a bit healthier? Looking for ways to cut the calories.
looks way too complicated, i’d rather just order out. who has time for all these steps?
Fascinating to see modern interpretations of frying chicken, a method with deep roots in various cultures around the world. This recipe is a testament to the evolution of cooking techniques over centuries.
Added some fire to the seasoning mix and it danced right off the plate! Perfecto!
Does anyone know the carb count on this? Trying to keep it keto-friendly.
Reminds me of my grandma’s fried chicken. Y’all nailed it with this recipe. Brings back memories.
Having tried fried chicken in over a dozen countries, I can say this recipe holds its own. It captures the essence of what makes fried chicken so universally loved while adding its unique twist.
Could I apply these methods to vegetables or tofu for a vegetarian option?
followed this before my gaming marathon, kept me fueled. GGs.
In all my years of cooking, I’ve always believed in the power of a good brine for poultry. This article reaffirms that belief, and I’m pleasantly surprised to see it being shared. Kudos for spreading good cooking practices, Sandra Clare.
Is there a gadget that can make the frying part easier and safer? I’m not great with hot oil.